The Weekly Diary is a daily self-tracking tool that a patient can use over the course of a programme. It covers a fixed period (7 days by default, though this can be configured) and allows the patient to log checklists/to-do items each day, optionally record a measurement, follow a plan of suggestions, and see an overview of their week against weekly goals. It also offers motivational feedback in the form of a streak counter and a "X of N days completed this week" indicator.
One Weekly Diary may be configured per programme, so every patient on a programme with this activated will be able to see the same setup.
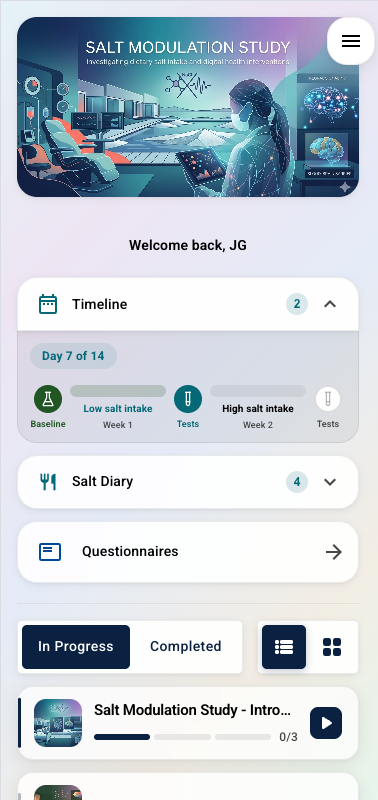
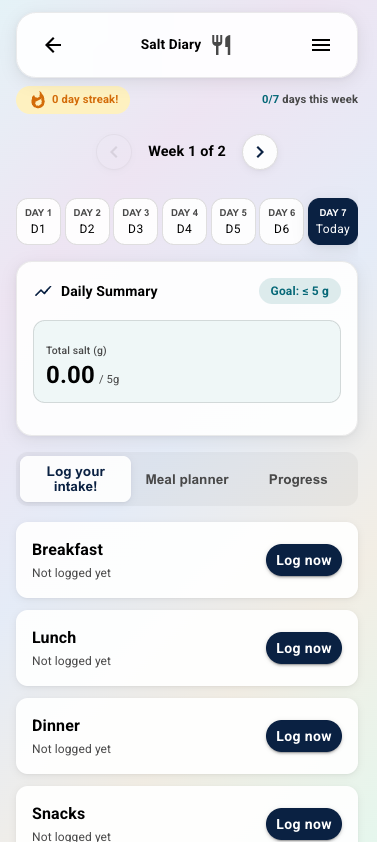
In the below guidance, we demonstrate the tool using a example where patients can log their salt intake for a salt modulation study; however, you can imagine that other potential scenarios include logging activities/exercises within a certain period, logging a certain diet or medication plan.
 |  |
CONTENTS
Enabling the Weekly Diary tool
Weekly Diary is an optional feature that can be enabled per programme. You are welcome to reach out to Youwell if you'd like it activated. Once it's enabled, a new Weekly Diary section will appear under Program Settings.
Configuring the Weekly Diary
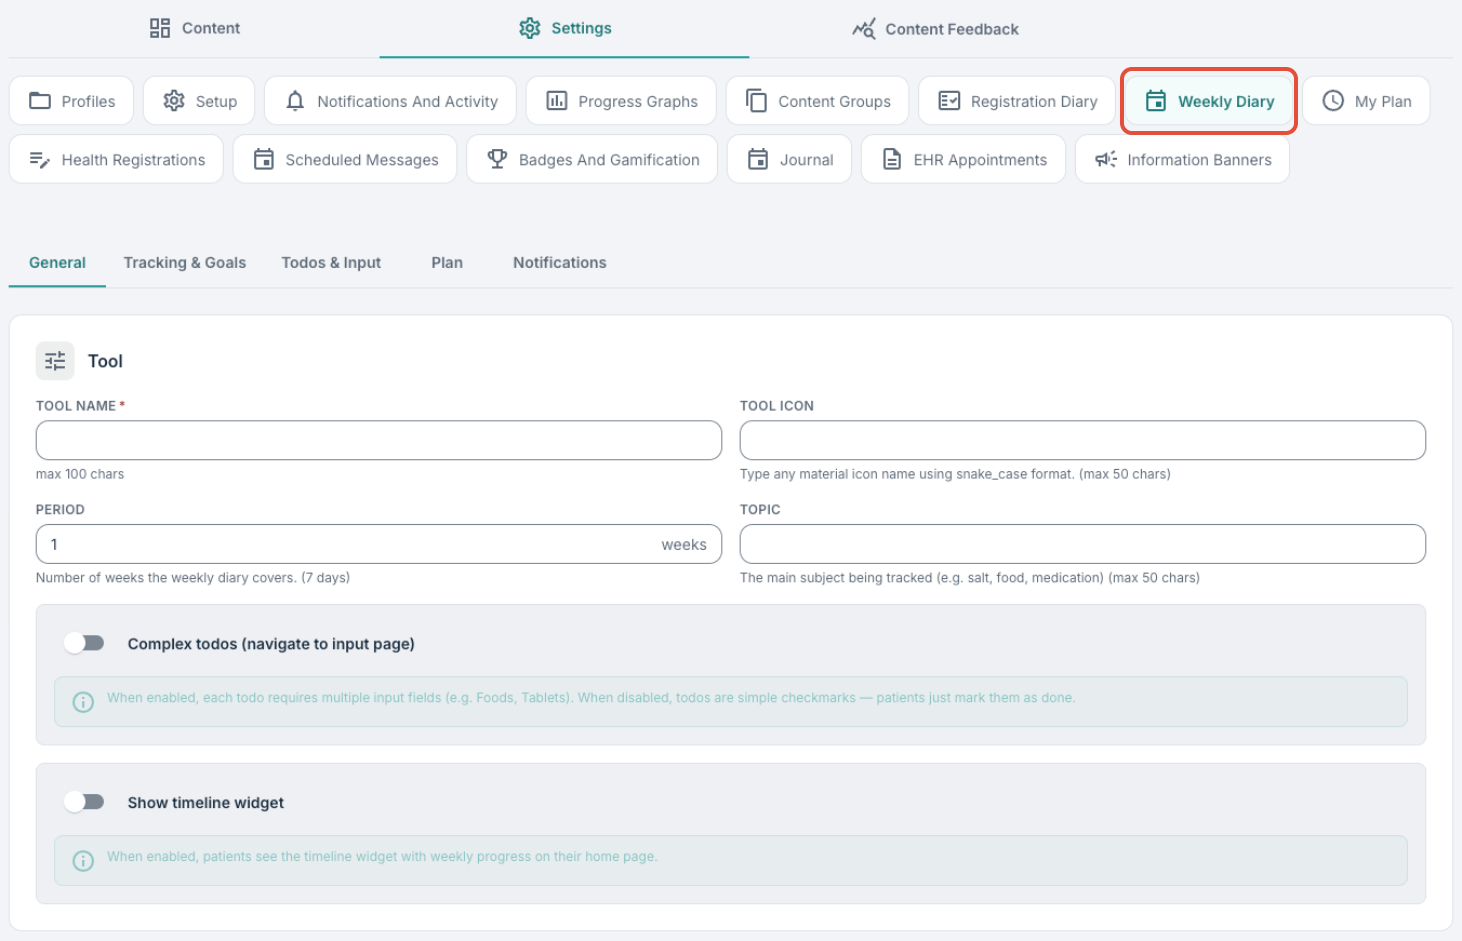
Setup can be found under Program Settings → Weekly Diary for the relevant programme. The page is divided into six sections that can be expanded independently, and changes take effect once saved at the bottom of the page. We will now walk through the different sections and explain what they adjust in the patient app view.
General: Tool & Tab labels
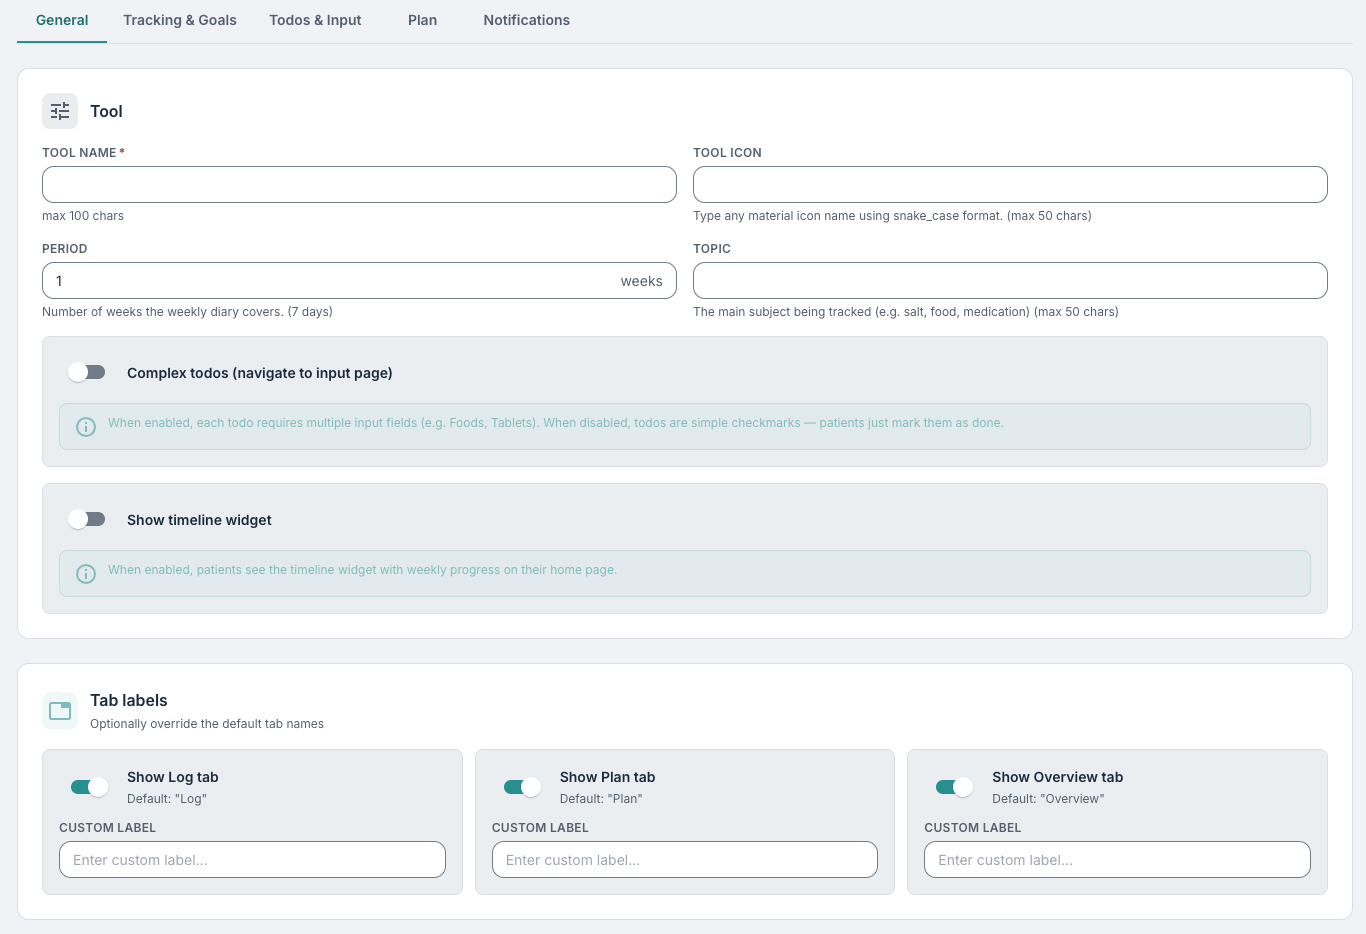
This section shapes the diary's identity and scope:
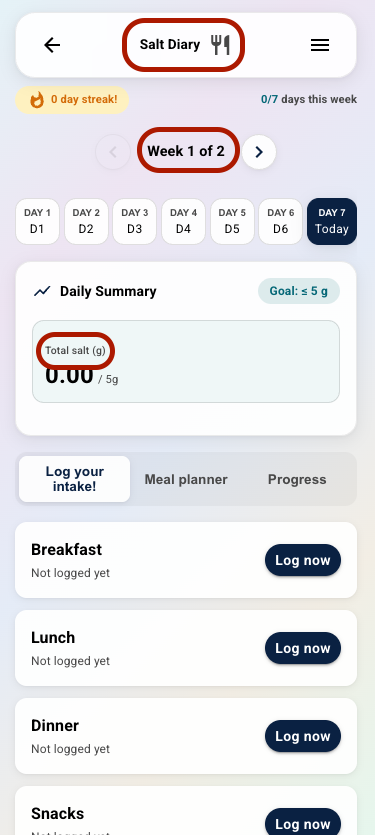
- Tool name — the name patients will see as the page title and widget label. This can be up to 100 characters long.
- Tool icon — a Material icon name in snake_case, e.g. "restaurant". A preview is shown alongside the field to help you choose. If you need assistance finding an icon, you may contact Youwell support.
- Period — the total number of weeks the diary covers. Note that given this tool is designed as a weekly diary, it is intended to be used with full weeks, as opposed to a certain number of days.
- Topic — a short subject label (e.g. "salt", "food", "medication"), which appears in the daily summary heading.
In the screenshot below you can see, based on the example input in the image above, how these selections affect the patient-facing tool:
The Complex todos toggle offers two ways for patients to mark a checklist item as completed:
- Off (default): a single tap on the action button logs the todo right away. This provides a simple checklist/checkbox-style logging.
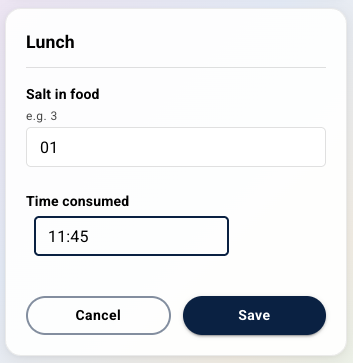
- On: tapping the todo opens a form where the patient can fill in one or more items. This can be useful if you'd like to capture more detail as a part of the registration process. When this is activated, the header of the diary page will also show an aggregate sum of the registrations provided.
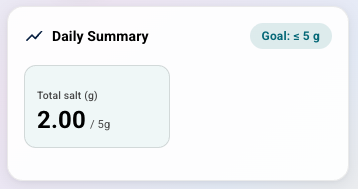
With complex todos turned on, a new Todo Input Definition field becomes available under Todos & Input.
You can also select to activate Show timeline widget which appears on the start page of the patient app. This is designed to inform the patient how far along in the study period they have come, and also helps to visually map out which section of the study they are currently in:
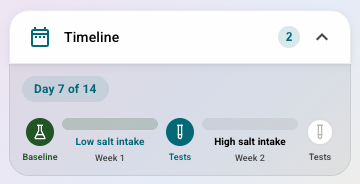
Note that this widget is only compatible with the newer patient app design from 2026, and will therefore not display if the legacy patient app design is in use.
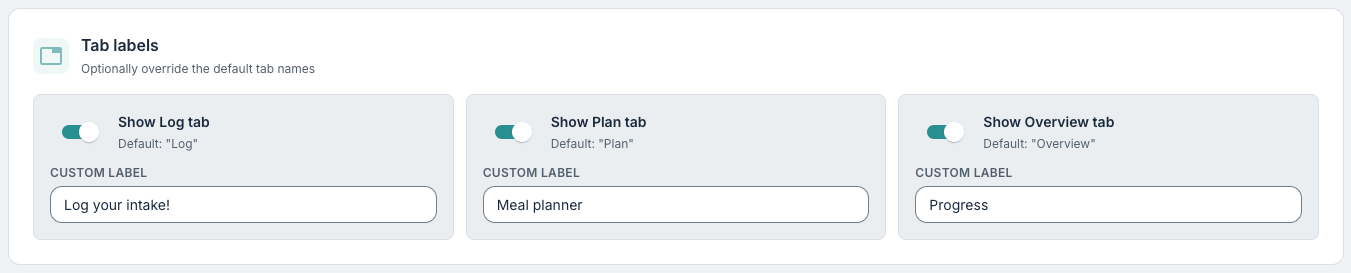
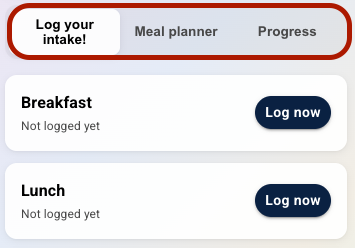
Under Tab labels you can select to activate tabs on the diary page which will help to guide and inform patients. They can be activated, and their labels can be adjusted here:
- Show Log tab — this tab is where patients can make their daily registrations.
- Show Plan tab — this tab is an additional information tab which can be used to provide guidance and tips.
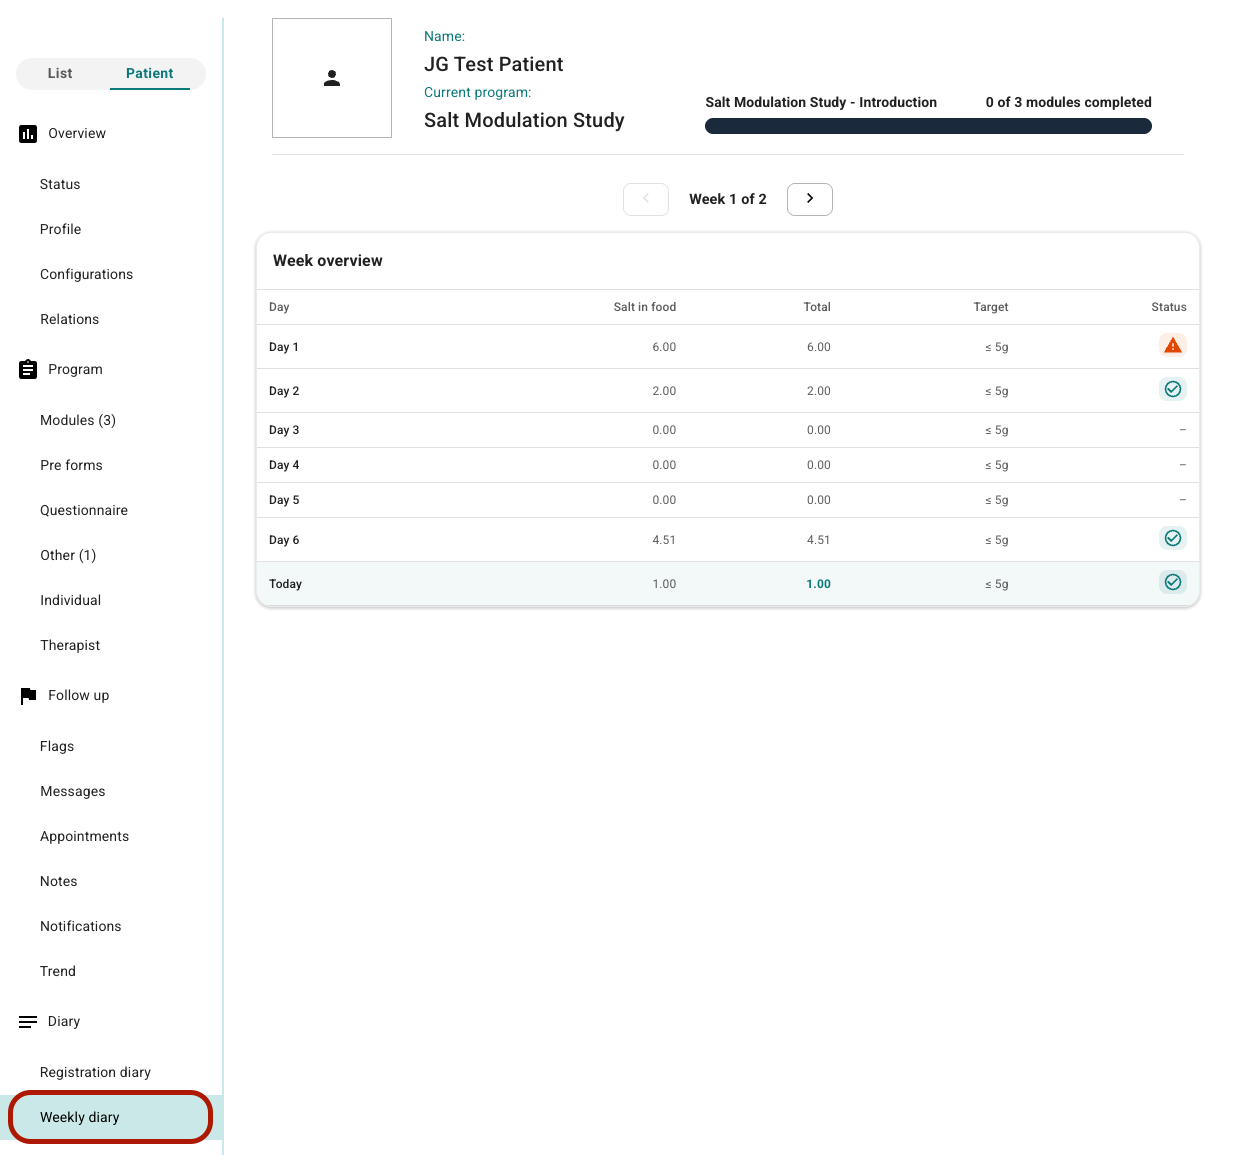
- Show Overview tab — this tab provides a summary table showing progress throughout the study, including total measurements if provided. This tab is also reflected for therapists so they can monitor the patient's progress through the study.
All three fields require a value when activated, this being the label which will be used in the patient app display.
 |  |
Tracking & Goals: Daily Summary card & Weekly Goals
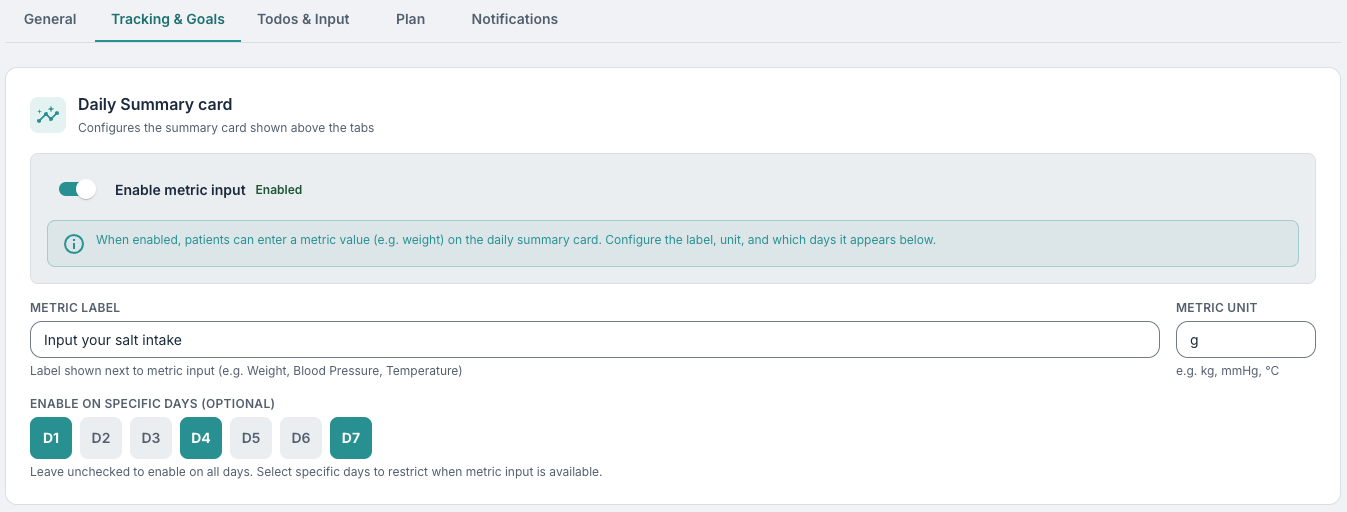
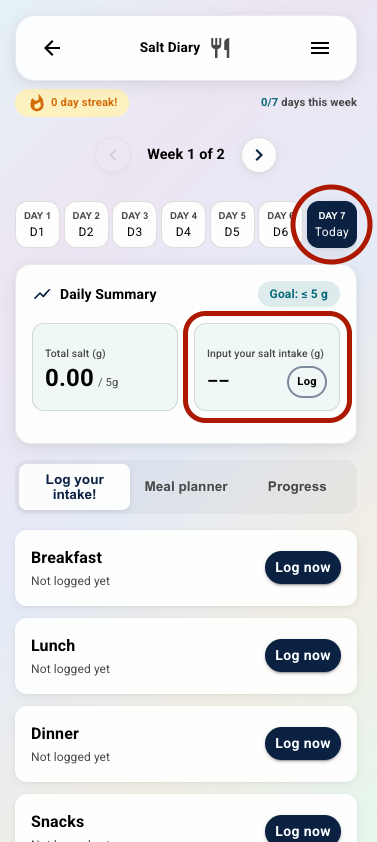
This section controls the summary card shown at the top of the diary page. If it would help patients to record a numeric value each day, you might consider activating Enable metric input. This is an optional section which you can choose to activate if needed:
- Metric label — a name for the measurement (e.g. "Weight", "Blood pressure", "Salt intake").
- Metric unit — the unit of measurement (e.g. "kg", "mmHg", "g").
- Enable on specific days (optional) — seven checkboxes (Day 1–Day 7) that let you choose which days the measurement is available on. Leaving this selection blank means that the input field is available every day, but selecting certain days, means the input field will only be active on the relevant days.
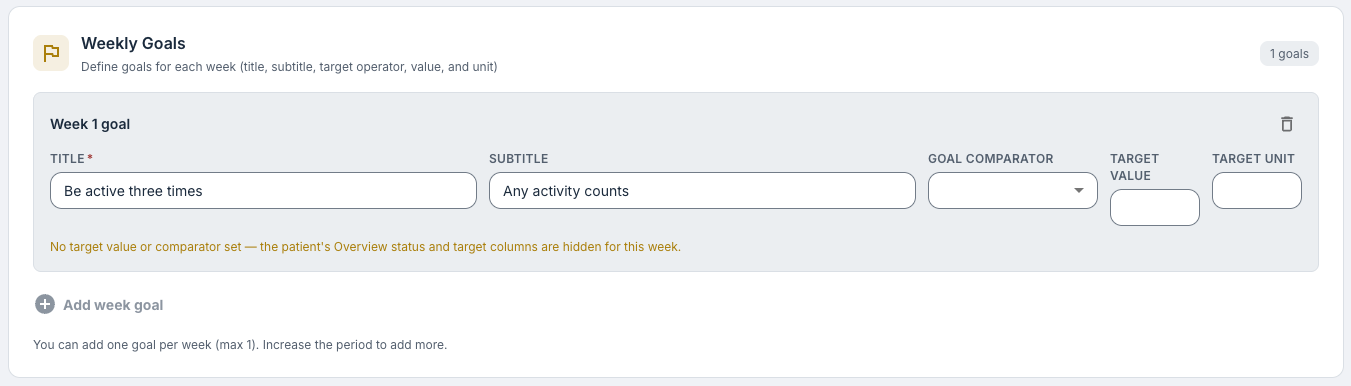
You may set one goal per week of the total period (defined in the Tool section). The order of the list determines which week a goal applies to — the first goal governs week 1, the second governs week 2, and so on. Each goal can include:
- Title — up to 150 characters.
- Subtitle — supporting text, up to 200 characters.
- Goal comparator — one of ≤, ≥, <, >, =.
- Target value and Target unit — e.g. 5 and g.
Together, these drive the Status icon (OK or warning) shown on the Overview tab for each day. For example, if you had set a goal of consuming 5g or less of salt per day during the first week of the study, and the participant logged 6g, they would see a warning icon under Status in the Overview tab (if this is activated).
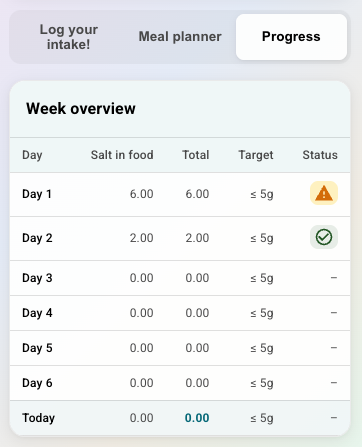
Note that if you delete or reorder a goal partway through the list, it can shift which week the remaining goals apply to, so it is always a good idea to double-check the list after making edits.
Todos & Input: Todos, Todo Input Definition & Enable time input
This is where you can configure what the patients or study participants will log each day. You can include one or more todos, each with:
- Todo label — what the patient sees. Up to 100 characters.
- Todo icon — an optional Material icon.
- Action label — text on the button that logs the todo (e.g. "Register").
- Completed label — text shown once the todo has been logged (e.g. "Logged").
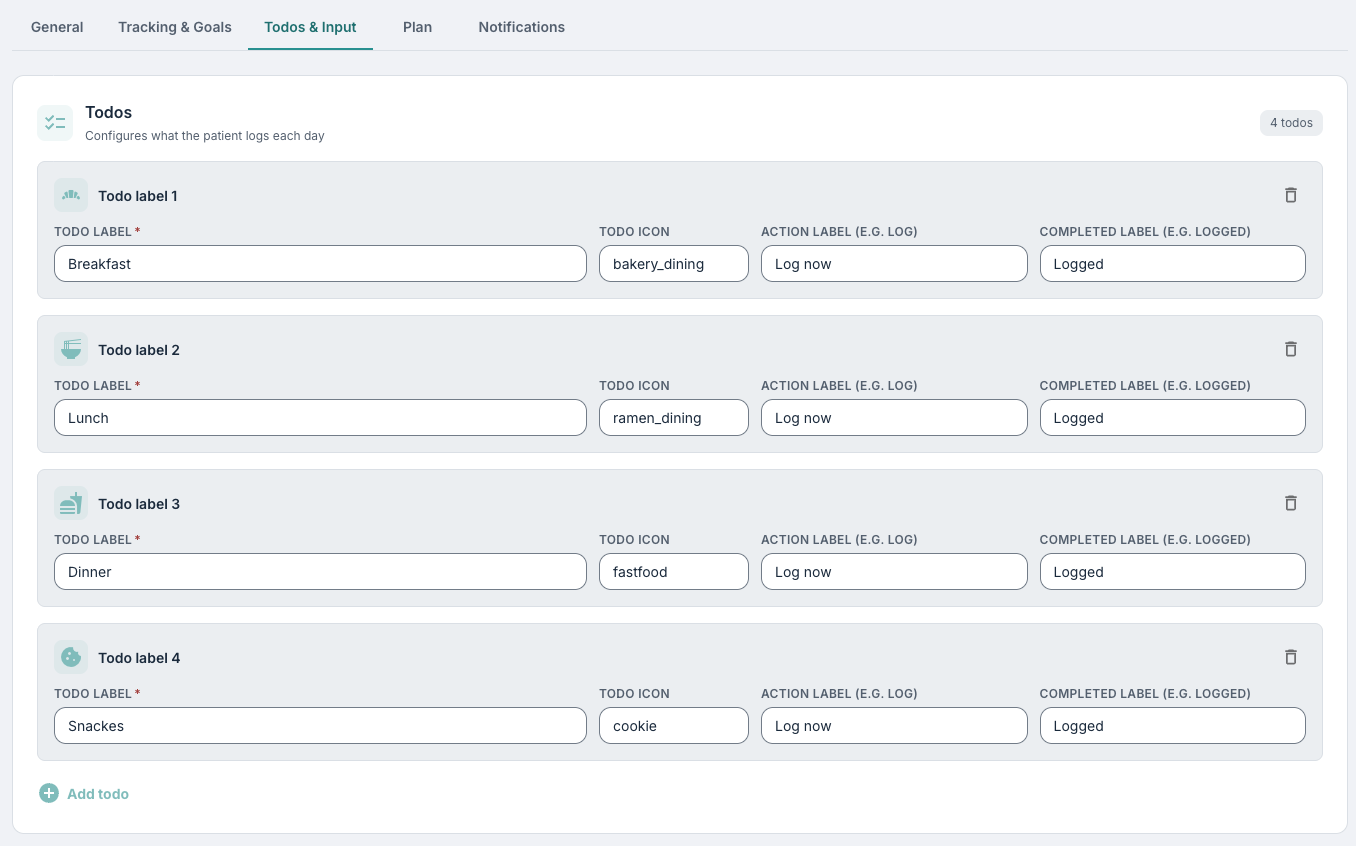
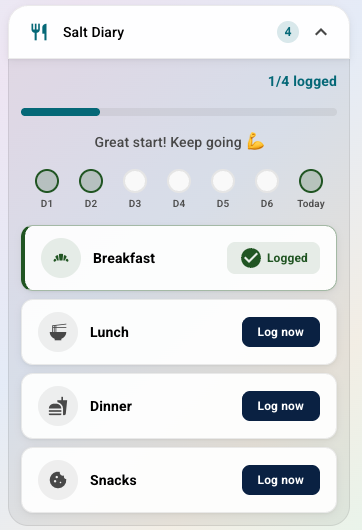
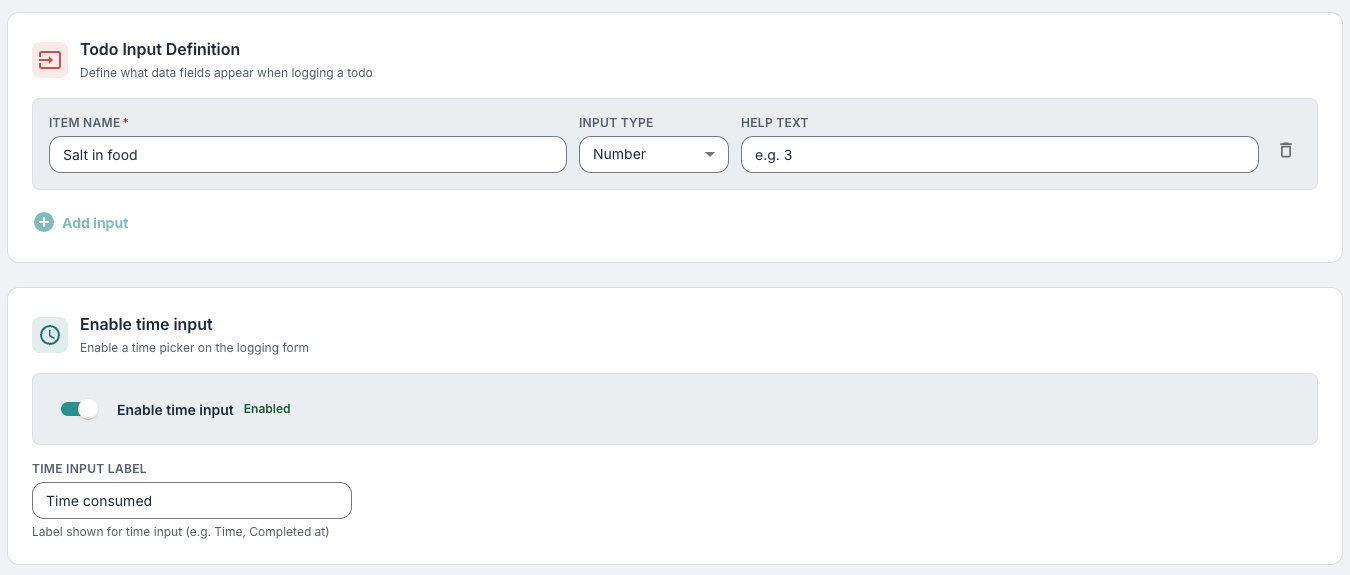
With Complex todos turned on (under General), a new Todo Input Definition field becomes available under Todos & Input.
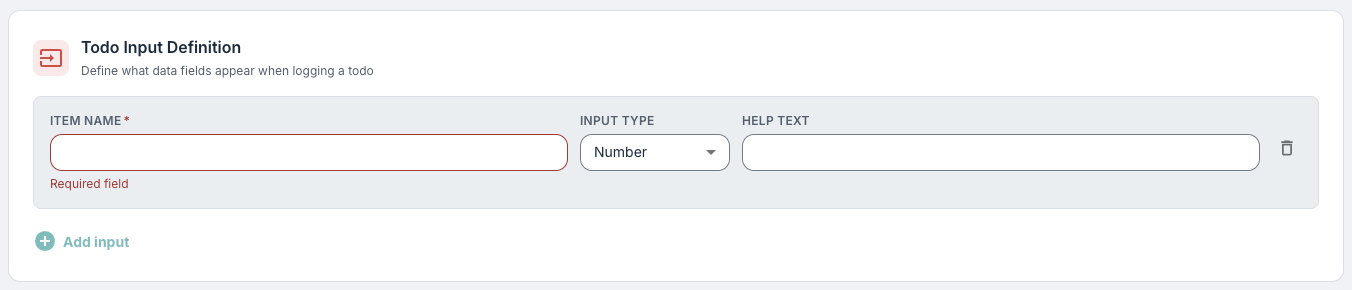
Each item can include:
- Item name
- Input type — either Number (a free-text number field) or Slider, depending on what feels most natural for the data.
- Help text — optional context you can add for the patient. Up to 200 characters.
You can also turn on Enable time input if it would be useful to capture a time of completion, with its own label.
 |  |
Plan: Suggestions
This is where you can add content for patients on the central Plan tab, which will appear beneath the given week's goal. You might add one or more suggestion groups, each with:
- Suggestion title — up to 150 characters.
- Items — a list of short bullet points (up to 150 characters each).
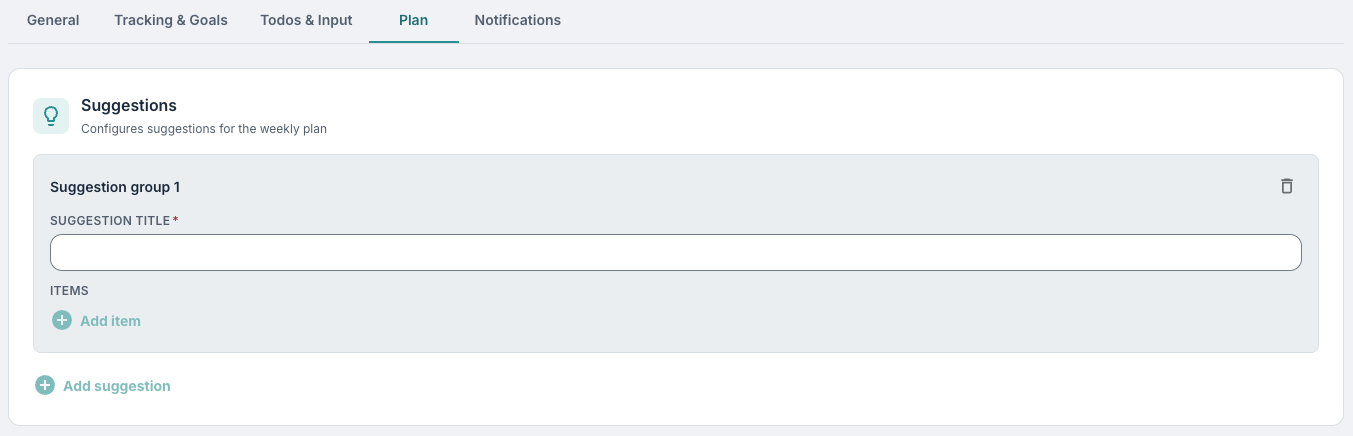
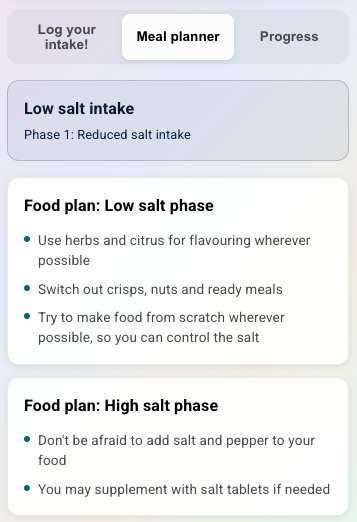
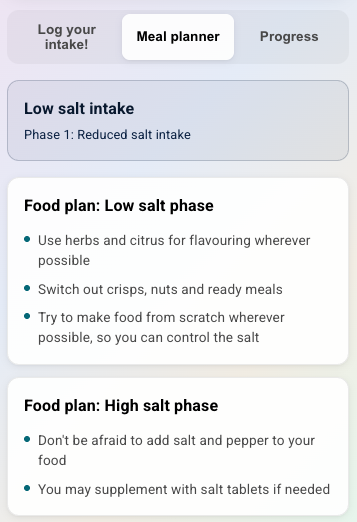
This space works well for practical tips, checklists, examples, or recommendations relevant to the study, whatever feels most helpful for your patients. An example could be adding suggestions per week of the study, with simple tips and ideas as items beneath each:
Notifications
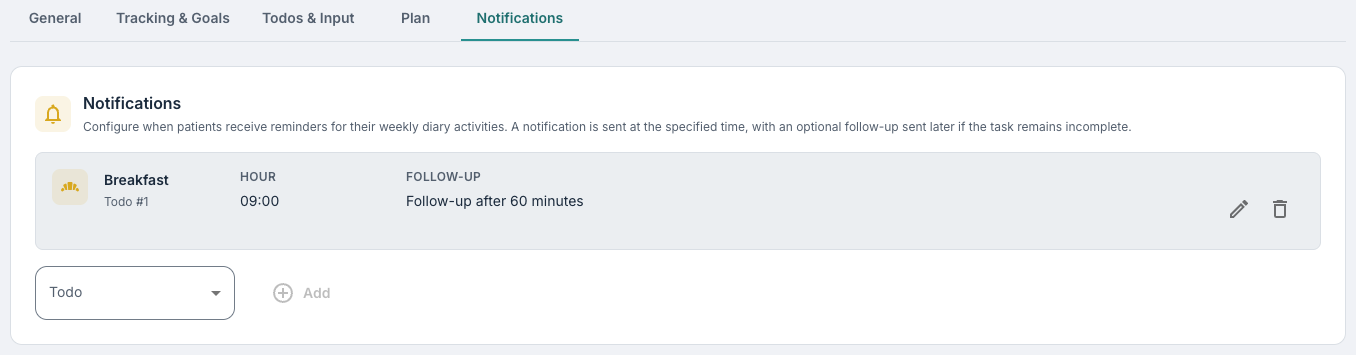
You may also select to activate reminder notifications on specific todos, including follow-up reminders if they are not logged within the time limit. You can select one of your todos from the list, input when you want to send a reminder notification to patients, and then optionally input how long after the initial notification you would like to send a followup if the given todo has not yet been logged.
Patient experience
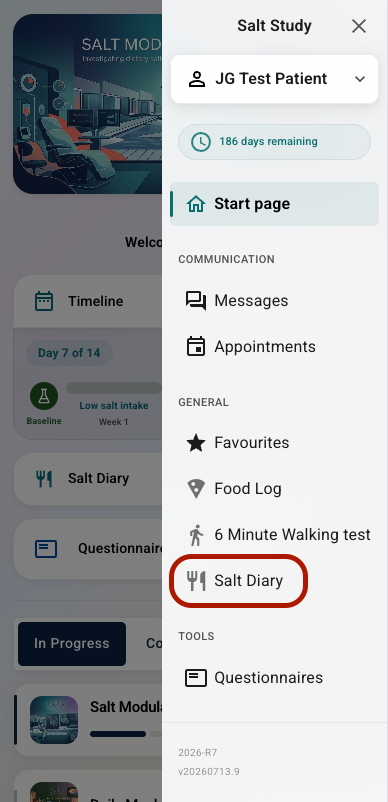
Patients and study participants can find the Weekly Diary as a menu item in the app, and also through the home-screen widgets explained above.
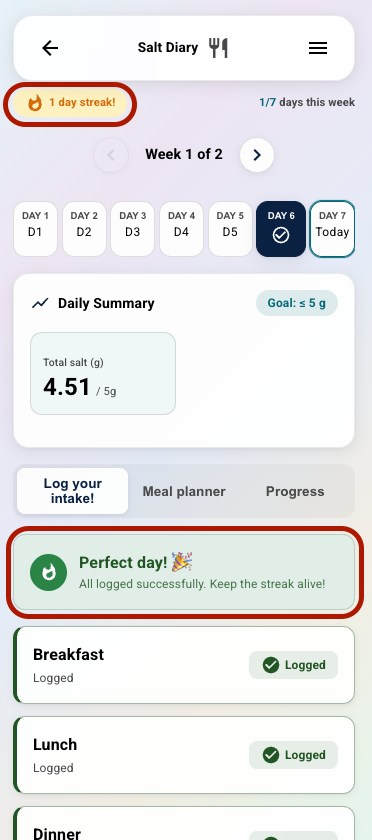
At the top of the registration page, patients will see:
- Streak badge — "X-day streak!" — reflecting consecutive days where all todos were logged. This is intended to provide encouragement and motivation to keep going throughout the given period.
- Weekly progress — "N/7 days this week".
- Week navigation — arrows for moving between weeks ("Week 1 of 4").
- Day selector — one button per day in the week. Today is highlighted, future days are disabled, and days where every todo has been logged shows a checkmark icon.
Below the header sits the daily summary card, which may include:
- The week's goal (e.g. "≤ 5 g").
- A running total for the selected day.
- Where measurement input is enabled and the day is active, a Log button that opens a number field — once recorded, this changes to "Logged" for that day.
Below the summary card, patients will find the tabs which you have enabled under Tab labels:
Log (Todos)
One row per todo.
- Simple todos can be logged with a single tap, flipping to a green "logged" badge.
- Complex todos open a form with a field per item and, if enabled, a time picker. Patients can save or cancel as needed.
- Once every todo is logged for the day, a friendly banner appears: "Perfect day! — Everything is logged. Keep the streak alive!"
Plan
- A card showing the week's goal (title and subtitle).
- Any suggestion groups you've defined, shown as short cards with bullet lists.
Overview
- A table with the week's days on one axis and items on the other.
- Columns may include a value per day, a total, a target, and a status (green OK / yellow warning) based on the week's operator and value.
- Future days show "–".
- If no goal or operator has been set for a given week, a gentle notice appears and the target/status columns are hidden.
Motivational feedback
Two widgets are available in the patient app when Weekly Diary is enabled:
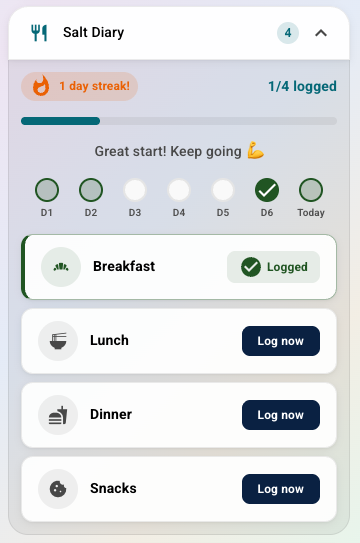
- Weekly Diary widget — shows today's progress bar, streak badge, a mini week calendar, and an expandable list of today's todos, so patients can log directly from the home screen if they like.
- Weekly Timeline — a multi-week checkpoint timeline showing progress from baseline through tests.
Both widgets hide automatically if no todos are defined, or if the feature isn't turned on. The home-screen widget's message can shift through the day depending on how much has been logged — for example:
- "Start logging your tasks for today!"
- "Good start! Keep it up"
- "Halfway! You're doing well"
- "Almost there! One task left to log"
- "Perfect day! Everything is logged"
Therapist view
Therapists will be able to view the same content as patients see in the Overview tab, under the Weekly diary area in the patient's profile. Here they can go back and forth between each week, and view the logged inputs per day:
Was this article helpful?
That’s Great!
Thank you for your feedback
Sorry! We couldn't be helpful
Thank you for your feedback
Feedback sent
We appreciate your effort and will try to fix the article