A programme can have several profiles, for example a shorter and a longer version of the same course, or a version with extra questionnaires for research. On the Timeline tab each profile is a separate expandable row, and profiles can be created, duplicated, reordered and configured without leaving the view.
This article covers the profile itself. Adding content to a profile is described in Program Timeline: Adding and arranging elements.
CONTENTS
Creating a profile
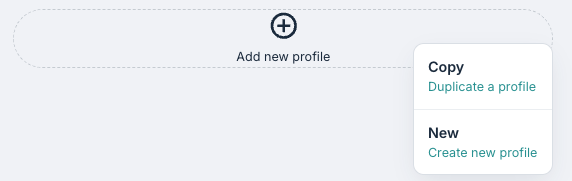
At the bottom of the timeline you will find a dashed button, Add new profile. Clicking it opens a small menu with two options:
- New – Create new profile. An empty profile is added and opened, with its settings panel ready for editing.
- Copy – Duplicate a profile. A list of the existing profiles is shown so one can be chosen as the starting point.
A new profile is named Profile 1, Profile 2 and so on, and starts with an active period of 12 weeks and an availability of 364 days after the active period. Any notification settings configured on the programme are carried over as the starting values.
Duplicating a profile
A profile can be duplicated in two ways: through the Copy button on an existing profile or via the Add new profile menu. The duplicate contains all the elements and settings of the original, and is named after it, for example Standard - copy, but of course you may change the name and make adjustments as needed.
Reordering profiles
Hovering over a profile header reveals a reorder handle on the right. Dragging it moves the profile up or down in the list. The order you see here is simply the display order for the profile list and does not change the content of any profile.

Profile settings
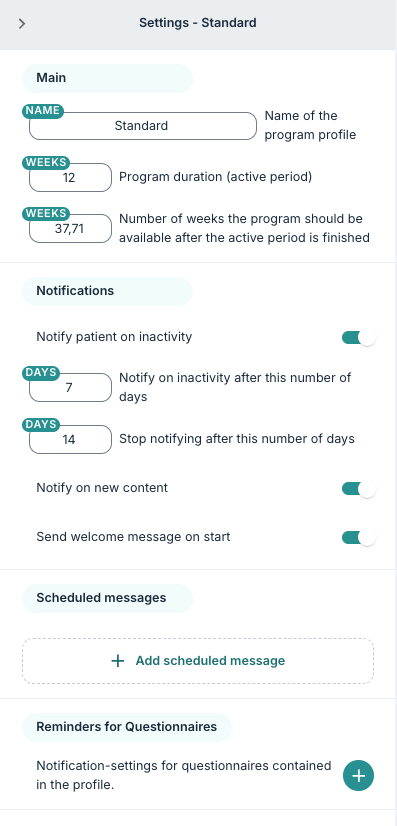
The cog symbol on a profile header opens the settings panel on the right of the screen. The panel header reads Settings followed by the profile name.
Main
The fields under Main are some baseline settings for the profile:
- Name – the name of the programme profile.
- Program duration (active period) – given in weeks. This is the length of the axis drawn on the timeline, and the period in which the patient is expected to work through the content. You may also know this as the active period of the programme, which can be configured at programme-level under Notifications and Activity.
- Number of weeks the program should be available after the active period is finished – how long the patient keeps access to the programme once the active period has ended. This is also known as the read access for the programme, which is configured at programme level under Notifications and Activity too.
Changing the active period redraws the timeline immediately, so it is visible straight away how the existing elements are distributed over the new length.
Notifications
The fields in this section help you to configure some standard notification settings for the profile:
- Notify patient on inactivity – when this is switched on, the two fields below it become available. Switching it on sets a default of seven days.
- Notify on inactivity after this number of days – how many days of inactivity pass before the patient is notified.
- Stop notifying after this number of days – when the inactivity notifications should stop.
- Notify on new content – the patient is notified when new content becomes available.
- Send welcome message on start – a welcome message is sent when the programme is assigned.
These settings apply to the profile you are working on. Where a profile does not set a value of its own, the value configured on the programme is used, and you will find this under Notifications and Activity.
Scheduled messages
As with the Profiles view, you can configure specific profile scheduled messages which will apply to the specific profile and overwrite any programme-based Scheduled messages. You can simply select Add scheduled message to create a new message, and input the Offset days, Send time and Message text. You can read more about scheduled messages here: Program Settings: Scheduled Messages.
Reminders for questionnaires
This section holds the default notification settings for the questionnaires contained in the profile. The plus symbol adds a reminder, given as a number of days, and the bin symbol removes one. Several reminders can be added, so you could have reminders set up for e.g. 1, 3 and 7 days after a questionnaire is assigned.
An individual element can override these defaults with its own reminders, as described in Program Timeline: Element settings and conditional opening.
Overridden settings
Underneath an expanded profile is a Profile Settings box. This is the same Override program setup tool that is described in Program Profile Settings, shown inline on the timeline.

If the profile overrides any programme or organisation settings, a green chip on the box shows how many, for example 3 overridden. The arrow on the right expands the box so the individual settings can be viewed and changed.
Removing a profile
With the profile settings panel open, a Remove profile button is available at the bottom of the panel. Using it will remove the profile from the list, and the removal takes effect when the changes are saved. Choosing cancel before saving restores it.
Was this article helpful?
That’s Great!
Thank you for your feedback
Sorry! We couldn't be helpful
Thank you for your feedback
Feedback sent
We appreciate your effort and will try to fix the article